
Can we afford to invest in a test station that only tests one product? This is the question on the minds of many original equipment manufacturers (OEMs) and other high-tech device-makers today. This post shares some of our test-station design insights and best practices gleaned from working with hundreds of OEMs in multiple industries over 25 years.
Key Takeaways:
- A modular test station architecture with 30 to 35% spare capacity helps absorb future product changes without costly redesigns.
- Reusable PXI instrumentation and swappable fixtures improve asset utilization while reducing changeover effort and over-specification.
- A standardized test executive simplifies software reuse, data consolidation, and deployment across multi-product manufacturing environments.
Optimization Starts with Test Station Design
Optimizing a manufacturing test station may sound like something you do once the system is up and running. In reality, the biggest gains are decided much earlier. The design phase is where flexibility and long-term cost are locked in. In many cases, this reflection should even start earlier, during design for test or proof-of-concept phases, where key assumptions can be validated before they become constraints in production.
Test is part of the product lifecycle, from early development to full production. When test strategy is defined too late or treated as an afterthought, you often end up with unnecessary complexity and higher capital costs. These decisions are difficult and expensive to reverse once the system is deployed, especially with a rigid station.
Thinking about optimization before the station is even built is what allows manufacturers to reduce redesign cycles, better use their equipment, and avoid overinvesting in systems that cannot evolve with the product.
5 Best Practices for Designing Flexible Test Stations
That is the reason why we would like to share with you what we consider very good practices when it comes to optimizing manufacturing a test station setup during the design phase.
As a teaser, these practices are:
- Build the Right Station Architecture from the Start
- Choose Instruments that can be Reused across Products
- Use Swappable Fixtures to Simplify Product Changeovers
- Standardize Software with a Common Test Executive
- Evaluate ROI Beyond the Initial Capital Cost
Let’s dive in!
1. Decide on Basic Architecture
A good starting point for designing a highly modular and adaptable test station is to identify which components you want to be “generic” (in the sense they could be used for multiple products) and those that are product-specific. Your ultimate goal is to design a station that can cover a wide range of your testing needs over the mid-to long term.
When designing your test station, we also recommend that you allow 30-35% extra capacity because your product features and testing needs will definitely evolve. This extra-capacity guideline applies to rack space, modular-instrumentation chassis slots, communication ports, switching channels, etc.
2. Maximize Instrument Usage
In aerospace and defense testing, for example, you will try to get the most value out of each test instrument because instruments typically represent the greatest expenditure in any test station.
Other industries can follow that example by carefully choosing instruments that will provide long-term value, such as open-architecture, modular PXI instruments. When selecting instruments, you need to ask important questions like
- Will they provide us with significant value over time for testing multiple products?
- Will they be easy to swap or upgrade?
- Will they support parallel testing or scaling if production volume increases?
- Will they remain compatible with future product interfaces and communication protocols?
- How much of their capacity will actually be used in production?
- Are they easy to maintain and replace without impacting production uptime?
3. Implement Swappable Fixtures
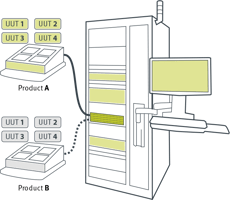
Many benefits can be achieved through the use of easy-to-swap fixtures. Instead of connecting fixtures directly to your instruments – which is time-consuming and prone to wear and tear – implement an interchangeable test adapter (ITA) such as those available from Virginia Panel, MAC Panel or others. While a good mass-interconnect ITA can be expensive, it will really pay off because it creates a rugged interface between your expensive instruments and your unit-under-test (UUT) specific fixtures, allowing you to quickly change testing from Product A to Product B, C, etc.
In the fixtures themselves, integrate all those product-specific elements – such as USB-JTAG downloaders and drivers – that you will only need for one product or even one iteration of the product. As well, you will probably have to consider adding some UUT-specific switching in the fixtures to avoid having to over-specify switching subsystems in the station; also plan to have a good switch controller in the station with all control lines routed to the fixture.
In effect, you will need to solve more of your product-specific test issues with your fixtures – which are considerably cheaper than instruments – to ensure your test station has the widest possible application.
4. Use a Standard Test Executive
In a multi-product test station you will need a flexible test executive – such as National Instruments’ NI TestStand – for your software architecture. The test executive sequences your tests and handles all your inbound and outbound test data, etc. Think of it as your high-value software interface to help organize and execute your testing and, importantly, to easily integrate test packages for new or updated products. This is particularly true when combined with a manufacturing test software like Averna Launch that simplifies the experience for the user.
A further benefit of a standard test executive is easy integration of an off-the-shelf test-data management product to consolidate your test results and make them available in standard reports.
By standardizing on one test executive you will also ensure that each of your test stations can be used by the maximum number of personnel, facilitating administration and operation. The last thing you want is to have highly customized, or unique, software architecture on each test station, complicating updates and troubleshooting, and exposing you to unnecessary risk should the station’s software architect leave the company.
5. Calculate your Return on Investment
As part of a next-generation test-station design process, it is of course important to do a detailed cost-benefit analysis to understand the upfront capital expenditures (CAPEX) as well as the longer-term financial savings and business advantages.
The following table presents a simple scenario where an OEM currently uses four test stations part time (two for Product A and two for Product B). Instead, the OEM could implement just three stations with swappable fixtures, allowing each station to be used full time to test either product, thus better aligning CAPEX with market demand and the organization’s priorities.
| Current Approach | Next-Gen Approach | Benefits | |
| Stations | 4 x $250K* | 3 x $300K |
|
| Fixtures | 4 x $15K | 4 x $20K* |
|
| Floor Space | 4 units | 3 units |
|
* Figures are for illustration purposes only. Actual test station and fixture costs can vary widely.
Finally, by designing a test station with multipurpose components such as modular PXI-type instruments, racks, cabling and test-executive software, plus product-specific components such as swappable fixtures and test packages, you will derive the greatest value from your test equipment, ensuring that it covers rapidly evolving feature sets and multiple products in the near term and for the foreseeable future.
Design a Test Station Setup that Scale with Averna
As a custom test station manufacturer, Averna designs and integrates test stations for companies that need more flexibility and a setup that can evolve with new products. Contact us if you need help in this regard.

--
You may also be interested in...
 Averna specializes in customized and automated solutions through flexible test platforms. Check them out!